


Articulation refers to how we control the beginning and release of a note with our tongues, breath support and even embouchure. This can be tricky to do at times. We want to sound clear, light and crisp. Instead, we may sound exactly the opposite: heavy, fuzzy and slow. This can be frustrating, but it doesn’t have to be that way. I’d like to share my easy, 5-step process with you (I use it to this day!) to help improve your articulation. These steps can be applied to any passage of music.
Articulation vs tonguing – why it matters
Before we get into the 5 steps, let’s take a slightly deeper look at what articulation is. We sometimes wrongly assume that tonguing and articulation are the same thing. While these terms are often used interchangeably, they are different.
Articulation is the broader concept of how a note begins and ends. When forming a note, there are three parts to that process: the beginning or attack, the middle of the note or sustain and the end or release of the note. This is controlled in part by the tongue which forms the attack of the note, but also by the speed of the air, how long or short you sustain that air through the note, and even the embouchure which helps give the note clarity, quality and ultimately may help taper or end the note.

Tonguing on the other hand refers to the action the tongue makes to begin a note. This is important because we sometimes think the tongue is responsible for creating the sound. Moving air creates the sound, the embouchure controls the sound and the tongue adds the attack and clarity to the beginning of that sound. As we explore these exercises, this concept will become clearer.
Let’s take a look…
Step 1: Play the passage slurred
My first step is to play the passage of music slurred. This means you play it all in one go, without tonguing the individual notes. Why is this a good place to start? Well, playing a piece of music slurred ensures that you are using your best sound. This is so important, as many of us compromise the sound and stop getting good air through the instrument as we start tonguing. Remember, the tongue does not create the sound!
Playing everything slurred has another very practical benefit. It is a great way to make sure that your fingers know what they’re doing. After all, if your fingers don’t even know what they’re doing, how can you expect your tongue to? I have often seen students blame their poor tongue when really, their fingers are to blame. So eliminate the tonguing and sort out the fingers first. Once you’re happy with your tone and fingers, let’s move on to the next step of the process…
Step 2: Play the whole passage using “hoo” sounds
In this next step of the process, we practice the whole passage by making little “hoo” (or “hu”) pulses from our abdomen. These “hu” sounds are just short little puffs of air, kind of like you’re blowing out a candle or a scrunched-up piece of paper off your hand.
I encourage you to try that, actually: take a small piece of paper and scrunch it up. Place it on the palm of your hand and now blow it off with a short, sharp burst of air. That is the “hu” we are looking for.
Now, get your flute into position and blow these short sharp “hu”s into your flute. Do not use your tongue at all, just the air to create the sound. Be careful that these pulses are not formed in your throat or by squeezing in your abdomen.
So what is the goal of making these sounds? Well, for one, playing like this reminds you to play with a good, supported sound. It also helps to understand that the note starts with the air moving, not with the tongue. Lastly, it’s also a great exercise for air direction. When you practice like this, you make sure you angle the air in the correct place on the flute. This will help us get cleaner articulation down the line.
Practice making these “hu’’ sounds until they sound nice and crisp. Then move on to the next step.
Step 3: “Puh” sounds
Next, we’ll be playing on “puh” sounds, which are formed when you put your lips together and then let the air gently separate them. To help you do this, start by gently pressing the lips together. Now let them pop apart as the air exits through them, making a small “puh” or “pooh” (yes, like Winnie the Pooh*) sound as you do this. Now do this on your flute. If you are not getting a sound, angle the air down a bit more by dropping your jaw a little lower.

Why do we practice this way? Well, it’s a great way to make sure that your embouchure is focusing the sound properly so that you can get a clean attack on each note.
When you first play these, they might sound pretty horrible and even start cracking. My advice here is just to stick with it and also don’t overcomplicate the exercise. You want to put your lips together quite gently and just let the air separate them to help you find that focus. So be prepared to let it sound terrible or not sound at all for a while.
Psst…this exercise is also a really great exercise for students with very tight embouchures! So if that’s you, give it a try…
Step 4: Increasing “tu” sounds
We’re turning up the heat a little bit with this next exercise. We can give the tongue a good workout by doubling, tripling and quadrupling the number of tongue strokes (“tu”s) we do on each note.
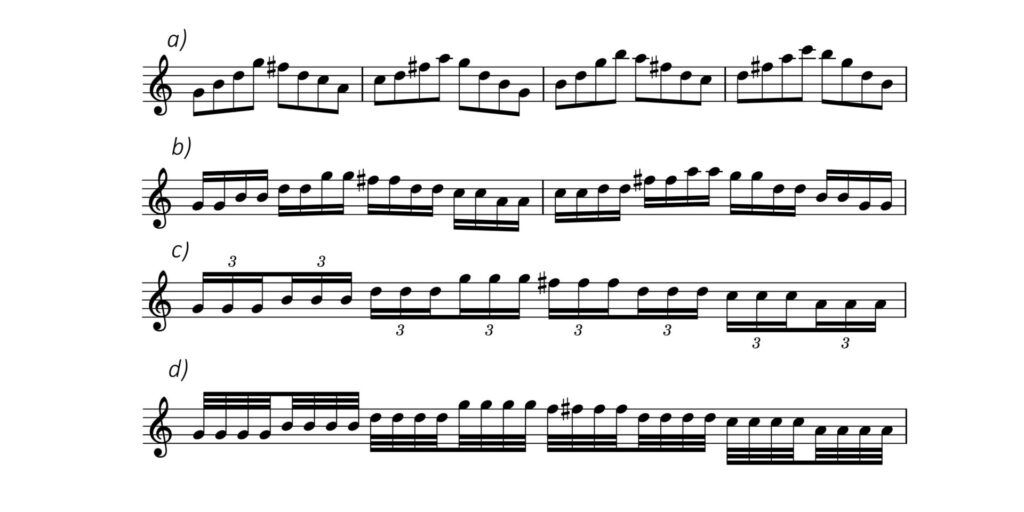
Let’s try this on an F major scale. Tongue each note of the scale once with a “tu”. Then, double, triple and quadruple the number of tonguings on each note. That means playing each note of the scale twice (doubling), three times (triple) and then four (quadruple) and even (gasp!) five times if you want an extra challenge. Your tongue should just be tapping the inside of the mouth very lightly and efficiently.
This is not the same as double or triple-tonguing. What we are doing is just getting the tongue to move faster and faster with the simple “tu”.
By the end of the exercise, your tongue may feel a little tired. You may also notice that as you increase the number of “tu”s on each note, the tongue lightens up and does not move quite so heavily. And this is the whole point of the exercise – teaching your tongue to be very efficient and light. As you increase the difficulty of these and overwhelm your tongue a bit in a sense, it is forced to be more efficient. So try it and see how far you can go!
Step 5: Play normally
Lastly, after doing all those articulation exercises, play the passage of music again normally. Even if it’s not perfect yet, you should feel and hear a difference from before. Oh, and you might want to just throw in another “hu” exercise before you play the whole passage again. It will remind you of that well-supported sound you’re going for. The “hu” exercise is my go-to exercise, personally, when it comes to articulation.
Articulation is an aspect of flute-playing we need to keep working on and polishing as flutists, but it helps when we know how to do that. If you’d like to watch me demonstrate all the tips I talk about here, head on over to the corresponding video, you’ll see it down below:
*Note: Thank you to Steven Clark and his book The Flute Gym for this comparison on Winnie the Pooh for the ‘puh’, hugely helpful!


Responses